Table of Contents
Maustasten belegen
Linux Mint (bzw. Ubuntu)
https://help.ubuntu.com/community/ManyButtonsMouseHowto
sudo apt-get install imwheel
Button 10 ist die Daumentaste.
/etc/X11/imwheel/startup.conf:
IMWHEEL_START=1
IMWHEEL_PARAMS='-b "0 0 0 0 0 0 10"'
~/.imwheelrc:
".*"
None,		ExtBt7,   Alt_L|F9
Und schließlich unter Einstellungen / Tastatur / Tastenkombinationen / Fenster / Fenster verkleinern
Alt + F9 einstellen (sollte aber auch Default sein).
Arch Linux
xorg-xev, xbindkeys und xdotool installieren:
pacman -S xbindkeys xdotool xorg-xev
mit xev Button Nummer herausfinden.
Maustasten mit xbindkeys auf Tastendrücke legen: ~./xbindkeysrc:
# Button 10 sends ALT+F9
"xdotool key alt+F9"
b:10
xbindkeys automatisch beim Einloggen starten: ~/.xprofile:
xbindkeys &
In Desktop-Einstellungen ALT-F9 auf gewünschte Funktion, z.B. Fenster minimieren setzen.
Mausgeschwindigkeit einstellen
Per 'xset'.
Z.B.:
xset m 5/4 0
Das ganze dann als Startup definieren,
#cat ~/.config/autostart/mouse.desktop
[Desktop Entry]
Name=Set mouse sensitivity
Exec=xset m 5/4 0
Type=Application
Comment=Use xset to set mouse params
Comment[en_US]=Use xset to set mouse params
Comment[de_DE]=Benutzt xset um die Maus-Geschwindigkeit einzustellen
Siehe auch: http://www.pontikis.net/blog/fix-mouse-sensitivity-ubuntu
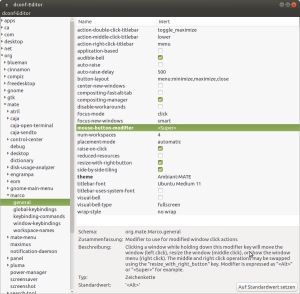
MATE Desktop: Window reize/move mit Windows (Super) Taste statt Alt
Arduino IDE unter Raspbian
https://github.com/arduino/Arduino/pull/4517
(http://downloads.arduino.cc/javaide/pull_requests/arduino-PR-4517-BUILD-514-linuxarm.tar.xz)
Einfach entpacken und ausführen.
Bluetooth RS232 Verbindung herstellen
$ sudo hcitool scan


Scanning …


00:02:C7:7D:F5:17 BlueGPS 7DF517


$ sudo rfcomm bind /dev/rfcomm0 00:02:C7:7D:F5:17 1


$ ls -l /dev/rfcomm0


crw-rw—- 1 root dialout 216, 0 2008-12-14 23:15 /dev/rfcomm0
Floppy auf 720 kB formatieren (USB-Laufwerk)
Von https://unix.stackexchange.com/questions/219533/how-to-format-720k-fat-ie-ms-dos-floppy-on-linux-using-usb-floppy-drive und https://fitzcarraldoblog.wordpress.com/2017/01/17/using-an-external-usb-3-5-inch-floppy-disk-drive-in-linux/
$ sudo ufiformat -f 720 -v /dev/xxx
Danach mit mkfs.msdos Filesystem erstellen oder per dd beschreiben.
$ sudo mkfs.msdos -I /dev/xxx
Git
#                                                                   #
# Command line                                                      # Bitbucket (prefered)
#                                                                   #


====================================== Create a new branch =====================================================

# Create and checkout branch                                        Bitbucket: Create the branch in Bitbucket
git checkout -b <branch>
                                                                    # Fetch the new branch and check it out
# Push (empty) branch to the remote repository                      git fetch
git push -u origin <branch>                                         git checkout LSAS-0815_CoolFeature

# Do the work: edit, add, ...

# Commit the branch
git commit -m "Insert commit message here"

# Push branch to the remote repository
# ***********************************************************
# Note: From Pro Git book: "In general the way to get the best of both worlds is to rebase local changes
# you’ve made but haven’t shared yet before you push them in order to clean up your story, but never rebase
# anything you’ve pushed somewhere.
#
# => so better first commit locally until finished, then rebase and then push to origin.
# ***********************************************************
git push    # Specify upstream if not already done above: git push -u origin <branch>


====================================== Rebase ==================================================================

# Update master copy
git checkout master
git pull

# go to branch which should be merged to master and make sure that remote is equal with your copy
git checkout <branch>
git pull    # only if branch is already pushed to origin

# Start rebase
git rebase master

# solve conflicts with an editor e.g foo.cxx has a conflict
kate foo.cxx # remove conflict
git add foo.cxx

# continue rebasing
git rebase --continue

# if there are no other conflicts to solve, push your branch to remote otherwise solve conflicts
git push --force


====================================== Merge the branch with master ============================================

git checkout master                                                 Bitbucket: Create pull request
git merge <branch>                                                  Bitbucket: Merge
git push                                                            Bitbucket: Delete <branch>
LUKS
https://wiki.archlinux.org/index.php/dm-crypt/Device_encryption

#################################
########## Preparation ##########
# - Boot a Linux from a USB stick or CD / DVD
# - Open a terminal


#################################
### Find the right partitions ###
lsblk -o name,fstype,size

# nvme0n1                477G
# ├─nvme0n1p1 vfat       512M  <== boot
# ├─nvme0n1p2 ext4     437,4G  <== root
# └─nvme0n1p3 swap      39,1G

# Set boot and root partition names according to above output!
BOOTPART=/dev/nvme0n1p1
ROOTPART=/dev/nvme0n1p2


###############################
########### Encrypt ###########

# Shrink root filesystem (NOT the partition)
sudo e2fsck -f $ROOTPART
sudo resize2fs -M $ROOTPART

# Encrypt
sudo cryptsetup-reencrypt --type=luks2 --new --reduce-device-size 4M $ROOTPART   # or --type=luks1

# resize the filesystem to its original size
sudo cryptsetup luksOpen $ROOTPART newcryptofs
sudo resize2fs /dev/mapper/newcryptofs


##########################################################
### Make the system boot from the encrypted filesystem ###

sudo mount /dev/mapper/newcryptofs /mnt
sudo mount $BOOTPART /mnt/boot

# Edit /etc/mkinitcpio.conf
sudo nano /mnt/etc/mkinitcpio.conf
# change MODULES=() to
MODULES=(nvidia_uvm nvidia_drm)
# set HOOKS to
HOOKS=(base systemd autodetect keyboard keymap sd-vconsole modconf block sd-encrypt filesystems fsck)

# Backup old config files and create new ones
for f in /mnt/boot/loader/entries/*.conf; do sudo mv $f $f.bak; done
echo -e "default arch\ntimeout 5\nconsole-mode max\n" | sudo dd of=/mnt/boot/loader/loader.conf
echo -e "title Arch Linux\nlinux /vmlinuz-linux\ninitrd /intel-ucode.img\ninitrd \
/initramfs-linux.img\noptions rd.luks.name=$(lsblk $ROOTPART -o UUID -n -d)=cryptroot \
root=/dev/mapper/cryptroot nvidia-drm.modeset=1" | sudo dd of=/mnt/boot/loader/entries/arch.conf
echo -e "title Arch Linux Fallback\nlinux /vmlinuz-linux\ninitrd /intel-ucode.img\ninitrd \
/initramfs-linux-fallback.img\noptions rd.luks.name=$(lsblk $ROOTPART -o UUID -n -d)=cryptroot \
root=/dev/mapper/cryptroot" | sudo dd of=/mnt/boot/loader/entries/arch-fallback.conf

sudo chroot /mnt
mount -t proc proc /proc
mount -t sysfs sys /sys
mount -t devtmpfs udev /dev

mkinitcpio -p linux
exit  # leave chroot

# reboot
sudo reboot
===============================================================================
# Convert luks1 to luks2 (or vice versa)
sudo cryptsetup convert --type=luks2 $ROOTPART

===============================================================================
